
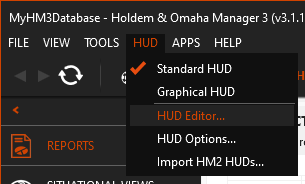
Access HM3's HUD Editor
Access HM3's HUD Editor from the HUD section in the main menu.
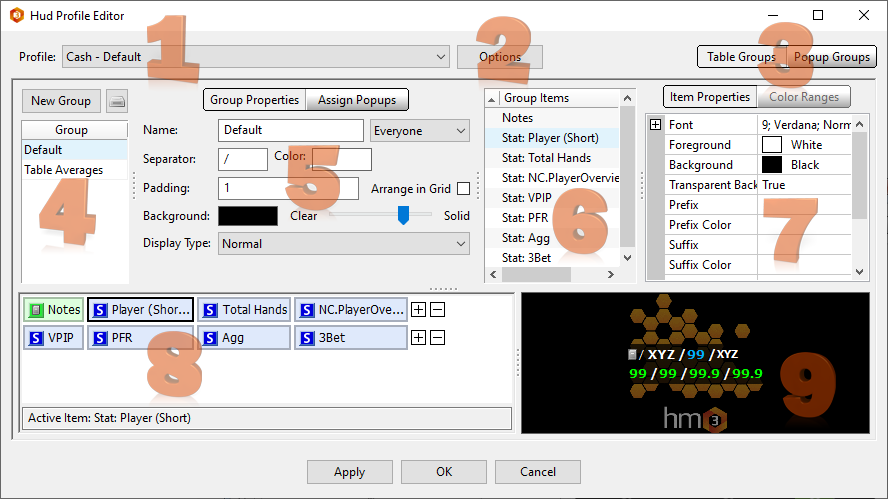
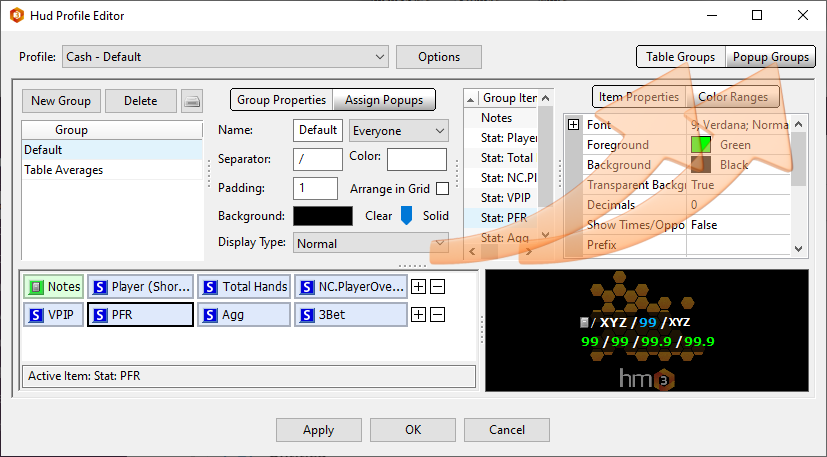
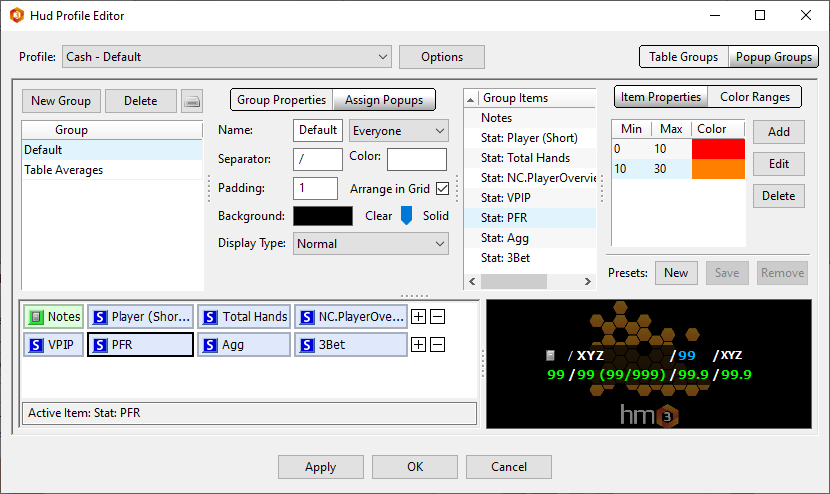
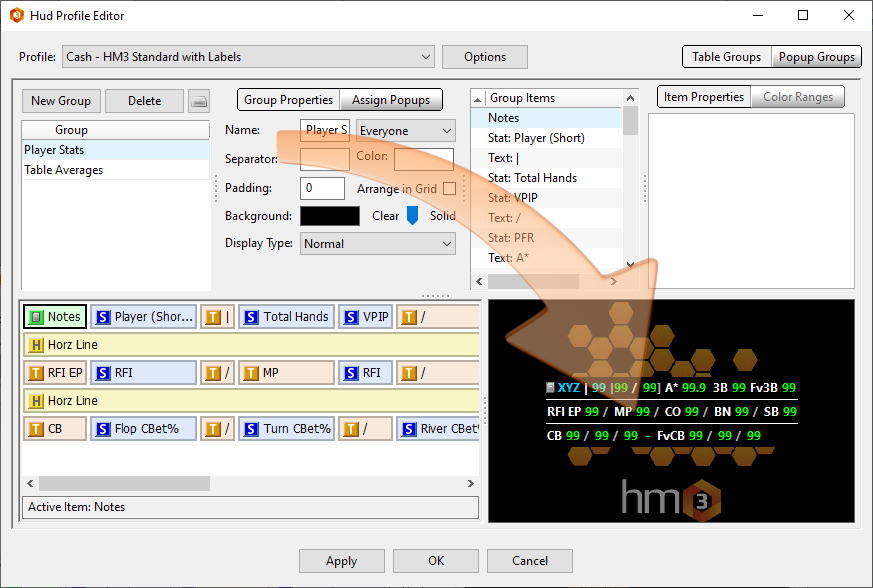
HM3's HUD Editor allows you to customize everything in your HUD Profile including stats, layouts, colors and popups.
Customize HUD Profiles
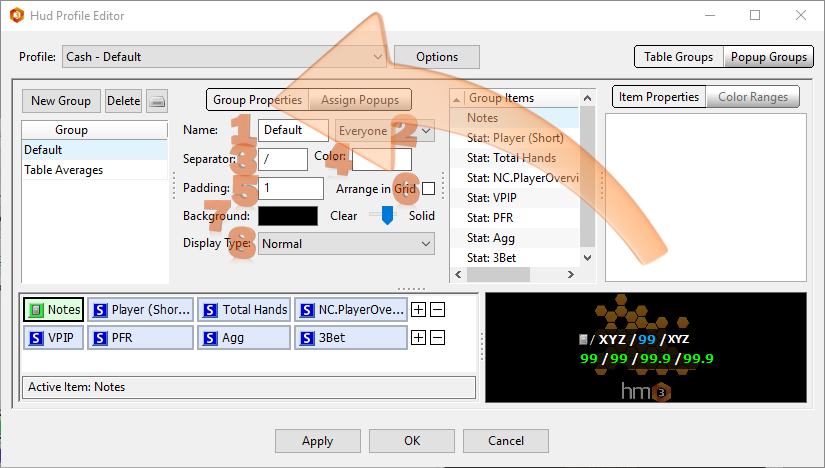
1. Profile Selector - Select the HUD profile that you wish to customize.
2. Options - Here you find options to manage your HUD profiles such as creating new profiles, importing, exporting, duplicating...
3. Table Groups & Popup Groups - These tabs allow you to choose which aspect of the HUD profile you want to customize. Table groups (HUD) that appear on the table, or Popups that can be accessed when clicking on HUD Stats.
4. Group - Select the HUD Group you wish to edit. You can also add, delete, import and export Groups.
5. Group Properties & Assign Popups - Edit selected Group Properties and Assign Popups.
6. Group Items - This is a list of all the Group items such as stats, text labels etc.
7. Item Properties & Color Ranges - Customize the appearance of selected HUD stats including color ranges, text, alignment, prefixes and more. Assign a single popup to a HUD Stat too.
8. Main HUD Editor Window - This is a grid representation of the HUD stats displayed.
9. HUD Preview Window - This is a visual representation of how your HUD will appear on the poker table.
1. Profile Selector
To Edit a HUD (Heads Up Display), select the HUD you wish to edit from the Profile drop-down menu.
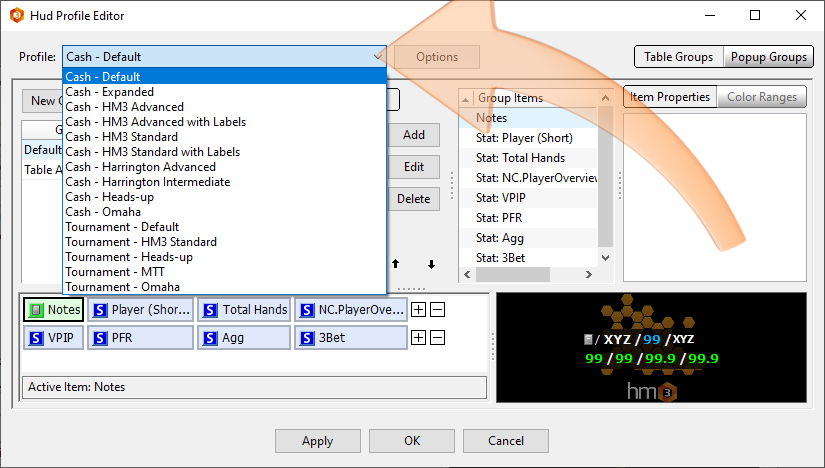
The HUD (Heads Up Display) is defined by a profile, which is a collection of HUD groups that contain various components displayed within the HUD. Each named profile is either a Cash or Tournament profile, and can only be used on the appropriate type of table.
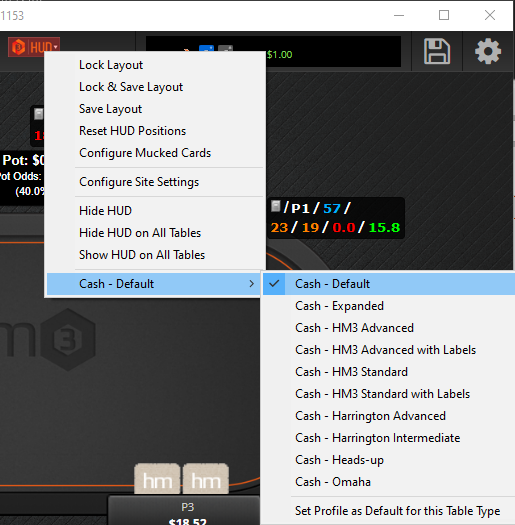
*** TIP ***
You can choose which profile to use on an individual table by clicking the HM HUD icon and select a different HUD at any time. (See Screen Below) See This FAQ for Details.
If you would like to make the profile default for the table type where you are currently playing, select "Set Profile as Default for this Table Type". See This FAQ for Details.
2. Options
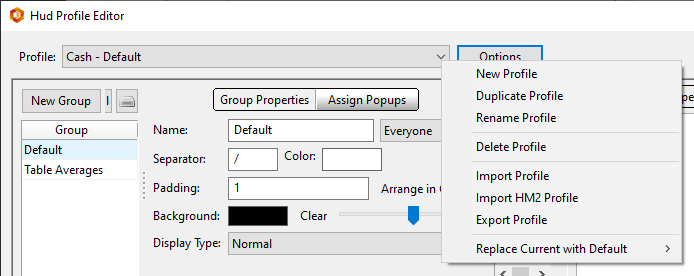
New Profile: Creates a new empty HUD Profile. You can name the new profile and choose whether it is a Cash or Tournament profile.
Duplicate Profile: Makes a copy of the current profile. You can name the new profile and choose whether it is a Cash or Tournament profile.
Rename Profile: Allows you to rename the current profile.
Delete Profile: Deletes the current profile. This cannot be undone, so please ensure that you are deleting the correct profile.
Import Profile: Creates a new profile from a profile file generated when you or another Holdem Manager 3 user Exported a profile.
Import HM2 Profile: Creates a new profile from HM2 HUD Profile file.
Export Profile: Writes the current profile to a file which you can share with other Holdem Manager 3 users or keep as a backup.
Replace Current with Default: Replaces the layout within the current Profile with the default profile you select, including all popup groups, table groups, or positional popups included within the default selected.
3. Table Groups & Popup Groups
Table Groups are your main HUD stats. Popup Groups are all of your Popups. (Click a HUD Stat on Live Tables to open a Popup.)
If you want to edit your HUD, use the Table Groups Tab. If you want to edit your Popups, use the Popup Group Tab.
Popup Groups (Stats) are edited just like Table Groups (HUD Stats). See #7. Item Properties & Color Ranges.
4. Groups
The Groups section on the left lists all Groups for the Selected HUD Profile ("Cash - Default" is the selected HUD Profile below).
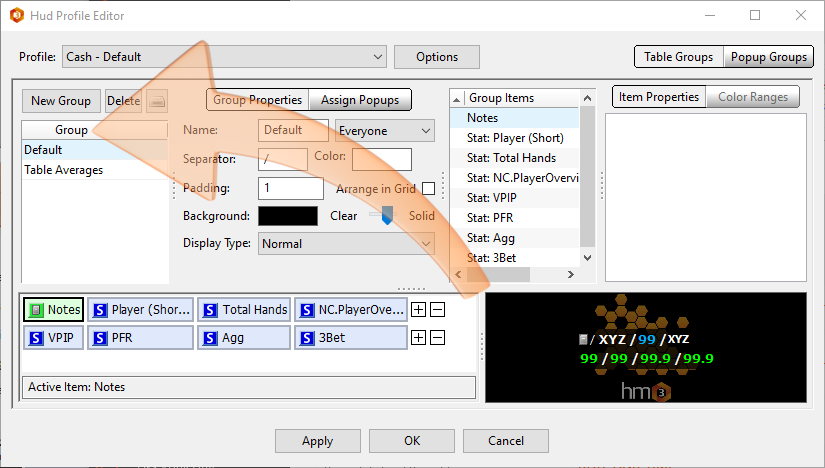
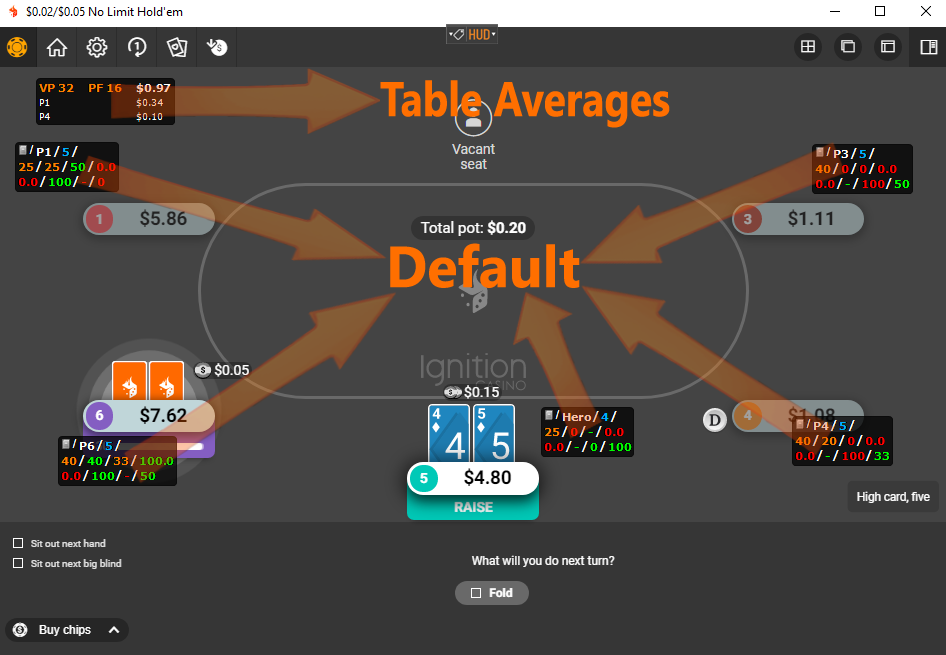
Groups are HUD elements. Default is the name of the HUD elements for all the different players at the table (Their Playing Stats), then the table Averages HUD element averages all key stats for the entire table. This lets you see how the table plays as a whole. (Super tight table, super loose table, etc.)
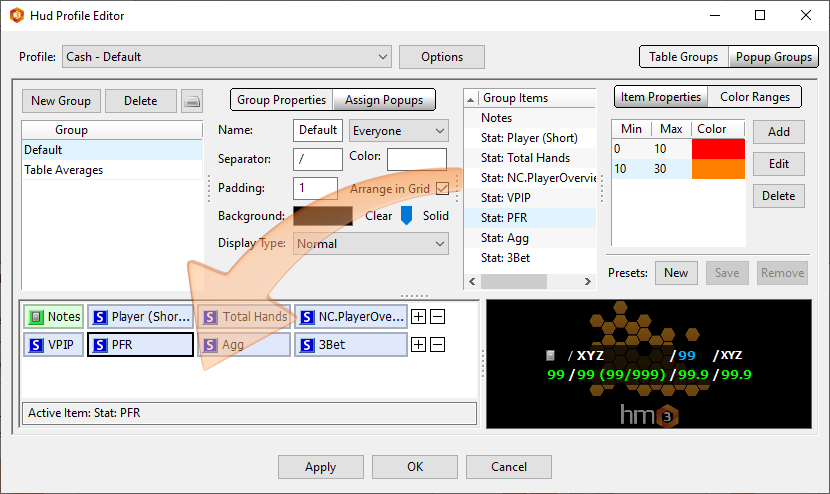
Add a new Group (HUD Element), delete a Group or import/export Groups with the buttons above the HUD Groups. (See Curved Arrow - Two Screens Above)
Click on a Group to select a Group in the HUD Editor. This is how you edit the different Groups (HUD Elements) in the rest of the HUD editor.
5. Group Properties & Assign Popups
Group Properties
Group Properties allows you to change the overall appearance of your selected Group (HUD Element)
- Name - Change the name of the HUD Group.
- Type of Group (HUD Element) - There are four types of HUD Groups:
- Everyone - Will display stats for every player at the table including yourself.
- Everyone But Hero - Will display stats for all players except you.
- Hero Only - Will display stats for you only. (The Hero)
- Table Averages - Will combine all players stats seated at the table and list the averages in a single Group. (HUD Element) This is usually in the top left of a live table.
- Separator - The screen above shows "/" between HUD stats. You can change this to any character on your keyboard.
- Color - Color is the default color for all HUD stats unless you've changed a HUD stat color in Item Properties (See #7 Item Properties Below).
- Padding - Increase this number to increase the space between HUD stats.
- Arrange in Grid - Will make your HUD stat columns line up horizontally if you have more than one row of HUD stats.
- Background - Change the Background color of your HUD Element, then select how transparent your HUD Background is on the right by adjusting the slider.
- Display Type - Normal & Lower Opacity Until Mouse Over. Lower Opacity Until Mouse Over can be very useful if you have large Groups (HUD Elements). This will let you see through the HUD elements until your mouse hovers over the players HUD. If you want to enable this option you also need to enable Allow Translucency in HUD Options > General Settings > Advanced (FAQ).
Assign Popups
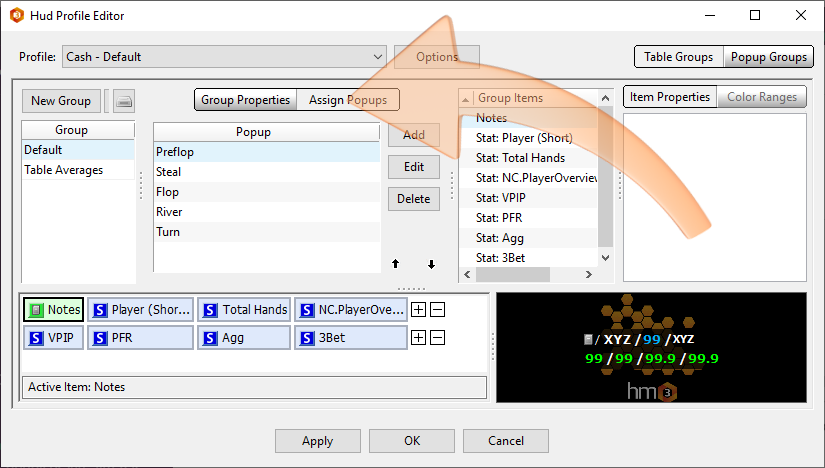
Assign Popups allows you to add or remove popups from the tabbed popup system in HM3. The up and down arrows below the delete button allow you to change the order of the popups in the tabbed popup system.
The tabbed popup system appears if no popup is assigned to a stat.
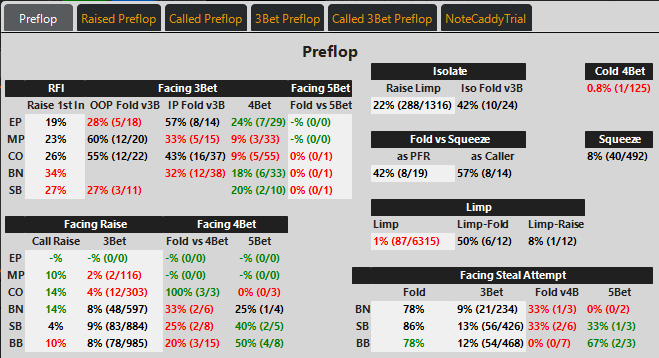
Tabbed Popup Example: (Tabs at the top)
If you want to assign a specific popup to a specific stat, you need to select the stat in your HUD Group, then assign a single popup to the stat in Item Properties - #7 Below.
To add, remove or adjust the order of the tabbed popups use the Add, Edit or Delete buttons. Edit will only replace the currently selected popup with a different Popup. If you want to edit a specific popup (Add New Stats, Etc) you will need to click "Popup Groups" in the top right of the HUD Editor, then select the popup you want to edit in the Group section to edit the popup.
6. Group Items
The Group Items section (Figure 1 Below) lists every HUD stat in your HUD. Clicking on a Stat in the Group Items section (1) is the same as clicking a stat in the main HUD Editor window (2). Once you've selected a stat, edit the stats appearance in the Item Properties tab (3) and assign a specific popup to the selected stat (Optional). See #7 Below: Item Properties
7. Item Properties & Color Ranges
Item Properties allows you to edit how the HUD stat will "look" or be displayed on live tables.
Color Ranges allows you to change the color of the stat based on what the stat value is.
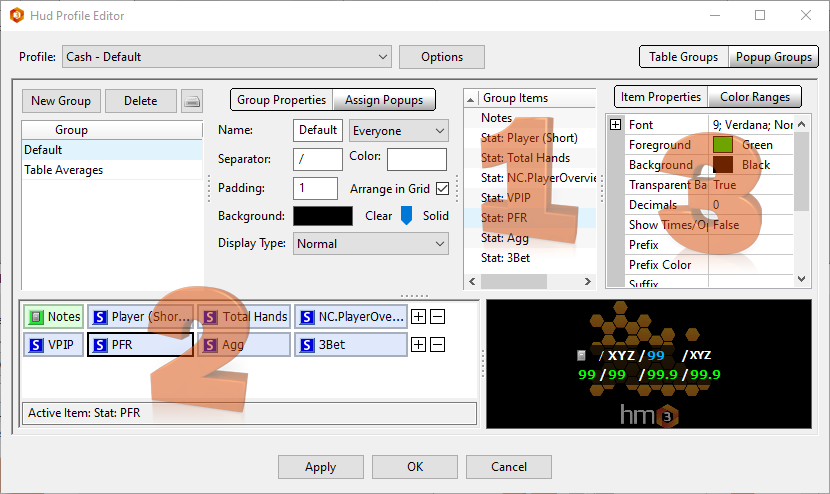
Item Properties
In the screen below we have the PFR (Preflop Raise) stat highlighted and any changes we make in the Item Properties will only edit the currently selected PFR stat.

You can edit the following:
- Font - Change the Font and Size of the Font.
- If you want to copy your font settings to another stat, select all the text in the font section and press CTRL-C then switch to another stat, select the font section to highlight all the text and press CTRL-V.
- Foreground Color - Change what color the stat displays as.
- Background Color - Change the background color.
- Transparent Background - True or False
- Decimals - In the example above, VPIP and PFR stats have no decimals (2nd row, left two stats). Agg and 3Bet use a single decimal (2nd row, right two stats).
- Show Times / Opportunities - This will display how many times and opportunities the action was taken. For example: If someone could've 3Bet 10 times, but only 3Bet twice, then the stat would read "20% (2/10)".
- Prefix - Letters to display before the stat value. This can be useful if you're using a custom HUD and trying to get familiar with where HUD Stats are displayed. Review the HM3 Standard HUD's with and without labels.
- Prefix Color - Change the prefix color.
- Suffix - Letters to display after the stat value.
- Suffix Color - Change the suffix color.
- Position - Select a specific position for the HUD stat or use Any for all positions. If you choose Early (EP), then the stat will only display data when the player played from early position.
- Number of Preflop Bets - Any, Limped Pot, Single Raised Pot, 3Bet Pot, 4Bet Pot, 3Bet Pot+. If you select anything but "Any" here, then the stat will only be calculated based on the preflop action you've selected.
- Alignment - Stat can be displayed to the left, center or right of the cell that it's occupying.
- Column Span - Increasing this number will put more space between your HUD stat(s)
- Popup - Select a specific Popup to use or select No Popup. If you select no Popup, then the default HM3 Tabbed Popups will open when clicking the Stat in your HUD.
Color Ranges
If desired, you can also add color ranges for the selected stat. To do so, click the Color Ranges tab and add/edit/delete. You can save color range defaults to use later or load previously saved color ranges.
In the example above, the PFR (Preflop Raise) stat is selected. The screen above will change the PFR stat color as follows:
- If the PFR stat value is 0-10%, the HUD stat will be colored Red.
- If the PFR stat value is between 10-30%, the HUD stat will be colored Orange.
- If the PFR stat value is above 30%, the HUD PFR stat color will be what you've defined in the Item Properties section for the selected stat. (See Item Properties Above)
PokerStars has Color Range restrictions. See the PokerStars (FAQ).
8. Main HUD Editor Window
The bottom half of the HUD Editor allows you to move any stat to any location within the HUD group by dragging and dropping with your mouse, CTRL+Arrow Key or right clicking the stat.
You can also see exactly what your HUD looks like with the preview window on the right.
Let's first start with how to add components to the HUD Group. Click the plus button to the right of any line or right click a stat and click Add Item. (See Below)
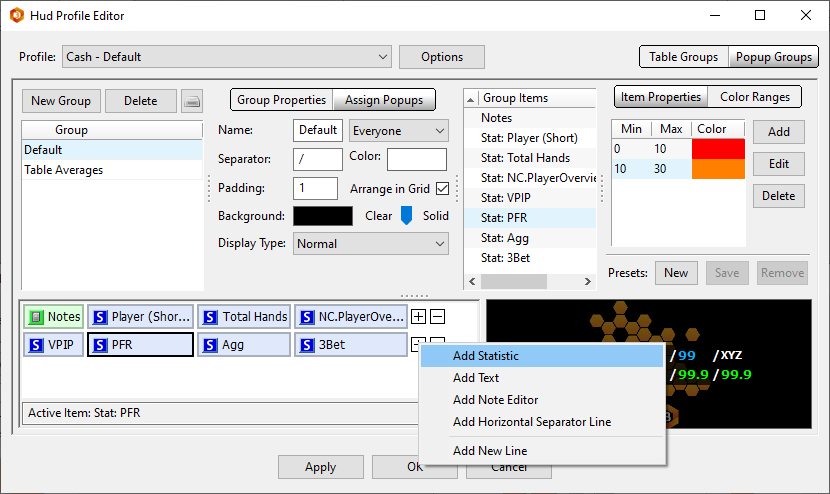
Here is what each option does:
- Add Statistic: Add any stat to the current HUD profile.
- Add Text: Here you can add any text (for instance, a custom separator or label) into your HUD.
- Add Note Editor: Add the Holdem Manager 3 free-form note editor into your HUD.
- Add Horizontal Separator Line: This will add a separator between two HUD lines, it is used to add organizational flare to your HUD Group design.
- Add New Line: Click this to add a new line to your HUD.
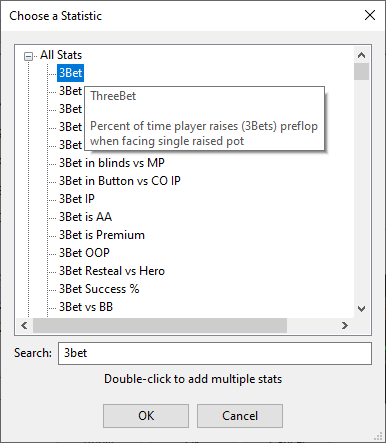
To add a stat just click Add Statistic to bring up the stat menu. From here you can search for stats by categories or use the search to find any stats you wish to add. Double click the stat or select the stat and click OK.
Once added, you organize the stat(s) in the stat layout. You can do this by clicking and dragging the stat to another location. You can also move stats by right clicking a stat and choosing which way you want to move it. Each time you move a stat you can preview the HUD layout on the right.
It should also be noted that you can easily delete stats. The first way to do this is to right-click the stat you wish to erase from your HUD and choose Delete Item. You can also delete an entire line of stats by clicking the minus sign at the end of the line and selecting Delete Line.
Once you're done click OK to save your changes.
9. HUD Preview Window
The HUD Preview Window allows you to see what your HUD is going to look like in the HM3 Replayer and on live tables.
Note: Transparent backgrounds for single stats and stat color ranges changes can not be viewed in the HUD Preview Window.
Suggested Video Guides
 (Video) HUD Profile Editor - Customize Your HUD
(Video) HUD Profile Editor - Item Properties
(Video) HUD Profile Editor - Color Ranges