Please see the NoteCaddy Badges FAQ for extensive instructions on working with and using badges.
How to Represent a Note With a Badge
Adding Badges to Your HUD
When playing multiple tables, it can be difficult to read a player's notes quickly and effectively without slowing down the action too much. The purpose of NoteCaddy badges is to display an image directly in a player's HUD when a very important note has been taken. This way, a NoteCaddy user can be alerted to his enemies' most important idiosyncrasies without having to hover over a note icon or stat.

For example, badges can be used to display notes that differentiate a player from average. The popup in the image above describes why this player got the donkey badge. It is because he has shown weak hands when donk-betting. A badge can be created for anything a NoteCaddy user wishes to know quickly.
How to Represent a Note With a Badge
There are two ways to make a note appear as a badge. The first way is to select a badge in the definition editor on the General screen.

This method is the recommended way to display badges for Deviations from Average. In the 'Advanced' tab of a Note Definition is where the settings exist to create these types of badges.
The second way to create a badge is with the help of Color Definitions. To create a badge from a Color Definition, you would create a new Color Definition. In this Color Definition you can apply the Badge icon and statistics you require for the badge to appear.
Color Definitions are useful to use as a badges because they do not require the NoteCaddy notes to be reset and reprocessed for their changes to take effect.
Adding Badges to Your HUD

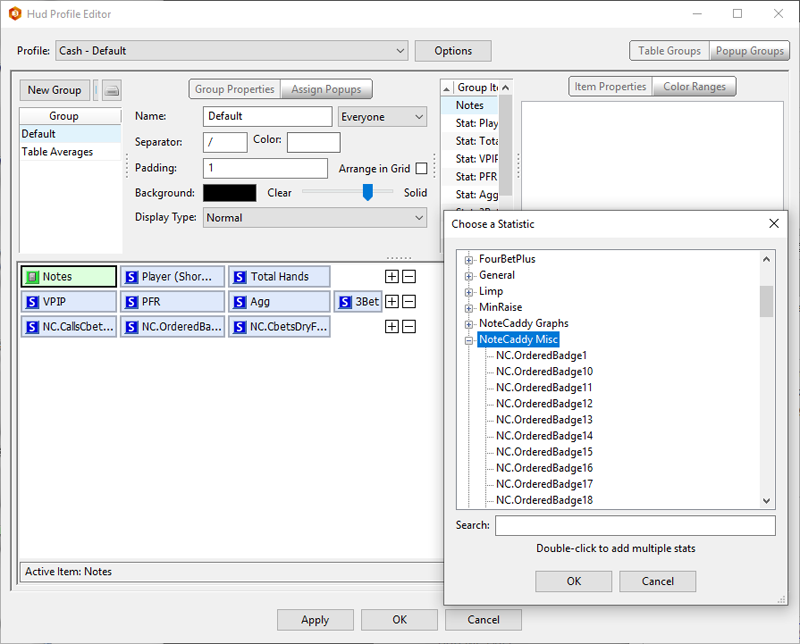
- Open the Holdem Manager 3 HUD Profile Editor.
- Click the "+" sign next to a HUD Stat row.
- Click "Add Stat."
- The "NoteCaddy Misc" section displays all NoteCaddy Badges (See Image Above).
- Add a badge to your HUD just like you would a standard stat, by double-clicking the badge in the list. Each badge slot should be given a different number (ie. NC.OrderedBadge1, NC.OrderedBadge2, etc.). This will ensure badges are not duplicated.
NC.OrderedBadges will display badges on the HUD according to 'Priority' that is set in their Note/Color Definition. Badges with a higher 'Priority' number will appear before a lower 'Priority' number (2 appears ahead of 1).
NC.PrefixedBadges take into account the 'Prefix' which is given to the Note/Color Definition. For instance, if we give all pre-flop badges the 'Prefix' "PRE", then we will have an option to use NC.PrefixedBadge.PRE1, NC.PrefixedBadge.PRE2, etc. This can be useful to make sure certain badges get placed exactly where you prefer them.


